
 Nöbetçi Eczaneler





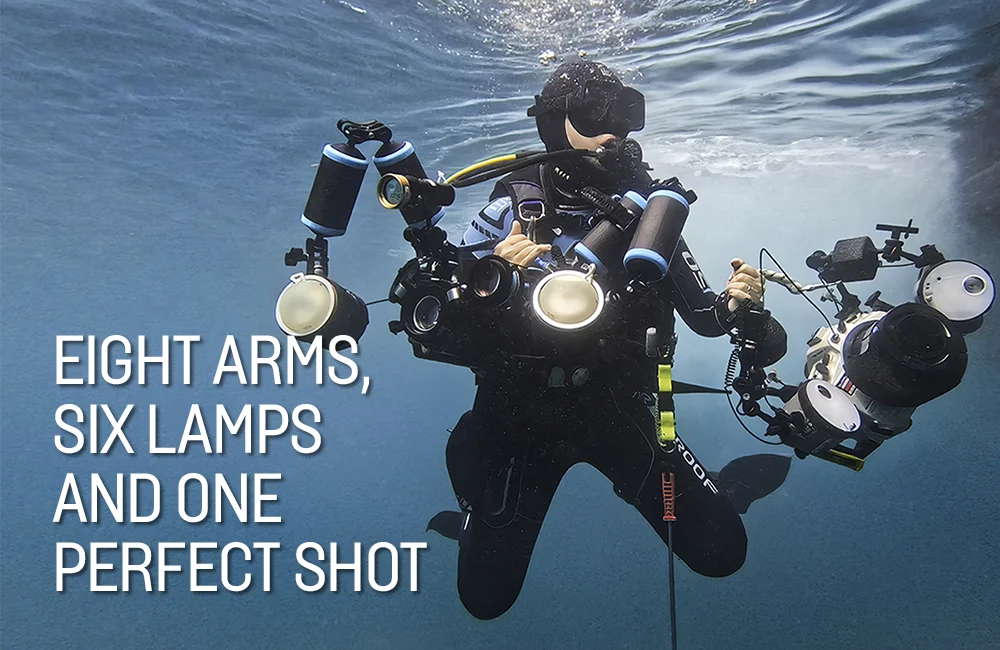
Award-winning photographer Nur Tucker on the art of mastering macro photography in the black sands of Lembeh Strait
Words and photographs by Nur Tucker
The first time I slipped beneath the waters of the Lembeh Strait, I had no idea it would permanently change the way I see the ocean – and the way I use my camera.
More than a decade ago, when I first heard about a macro photography workshop in Lembeh, I didn’t get why people would be excited.
Lembeh doesn’t have dramatic coral walls or postcard-perfect reefs; its seabed is mostly black volcanic sand. I remember thinking, ‘why would I want to dive there?’ I couldn’t have been more wrong.
Lembeh sits within the Coral Triangle, and its seemingly empty sands hide an extraordinary concentration of rare and highly specialised creatures.
Pygmy seahorses perfectly camouflaged on gorgonians, flamboyant cuttlefish pulsing with colour, and the unmistakable warning of a blue-ringed octopus. Curiosity turned quickly into obsession and that first visit turned into an annual pilgrimage.
I’ve dived around the world, from the icy edges of the Arctic to the warm reefs of Indonesia, but Lembeh is unique. When I first visited, I thought I understood underwater photography, but it took only a few dives to realise that I didn’t.
Working with mentors such as Dr Alex Mustard and the late Martin Edge fundamentally reshaped my approach to macro photography, which is, at its core, the art of light control. Move it, shape it, restrain it, and a single seahorse can be interpreted in dozens of different ways.
The smallest focus area of the camera is often larger than the subject, and just a few millimetres’ change in the position of your lights can transform an image entirely.
I began experimenting obsessively: snoots, narrow-beam torches, unconventional and vintage lenses, light painting, extreme shallow depth of field, double exposures. Once, I even used a sparkly scouring pad to create a textured background behind a seahorse.
These experiments changed how I see – teaching me to slow down, to observe behaviour, to anticipate movement, and to accept that failure is part of the learning process.
Macro photography in Lembeh is not for the faint-hearted. I often wish I could dive with a case full of all the gadgets I need, but instead I dive with two rigs, one with a normal macro lens and the other one equipped with a vintage lens.

I’ve learned over time, however, that macro photography isn’t really about equipment at all – it’s about problem-solving in three dimensions. One hand stabilises the camera. A narrow-beam torch is placed with millimetre precision; perhaps a second paints texture from the side.
I’m peering through the viewfinder, adjusting my buoyancy, watching the subject’s behaviour – all while being acutely aware of stonefish, delicate animals, and my responsibility not to disturb the environment.
The dive guides from Critters at Lembeh, my go-to dive centre, are absolute lifesavers when I visit. They spot creatures that I’d swim past a hundred times, and when I’m juggling lights and strobes, they become my extra hands underwater, and I cannot thank Opo K, Sandro, Jendry and Vardy enough for all their help.
My experiments have resulted in competition success in recent years, but I don’t enter competitions to win; I enter them to learn. Judges reward originality, forcing you to be ruthlessly self-critical. Almost everything you can think of has been done before, so the only way to stand out is to take risks. Many attempts fail spectacularly, but occasionally, everything aligns – and that’s why I keep pushing.
Over the years, I’ve built a small but ever-growing toolkit of techniques that help me turn Lembeh’s black sand and tiny subjects into something more expressive.
None of them is particularly complicated, but using them together underwater often feels like conducting a very delicate orchestra while hovering over a subject no bigger than a fingernail, which makes the idea of needing eight arms and six lamps to capture one shot feel entirely reasonable.
THE EIGHT ARMS & SIX LAMPS TOOLKIT
Experienced underwater photographers will be familiar with most of the terminology I use here, but for beginners and those looking to advance their skills, these are the tools and techniques that shape my images, and how I use them.
NARROW-BEAM TORCH
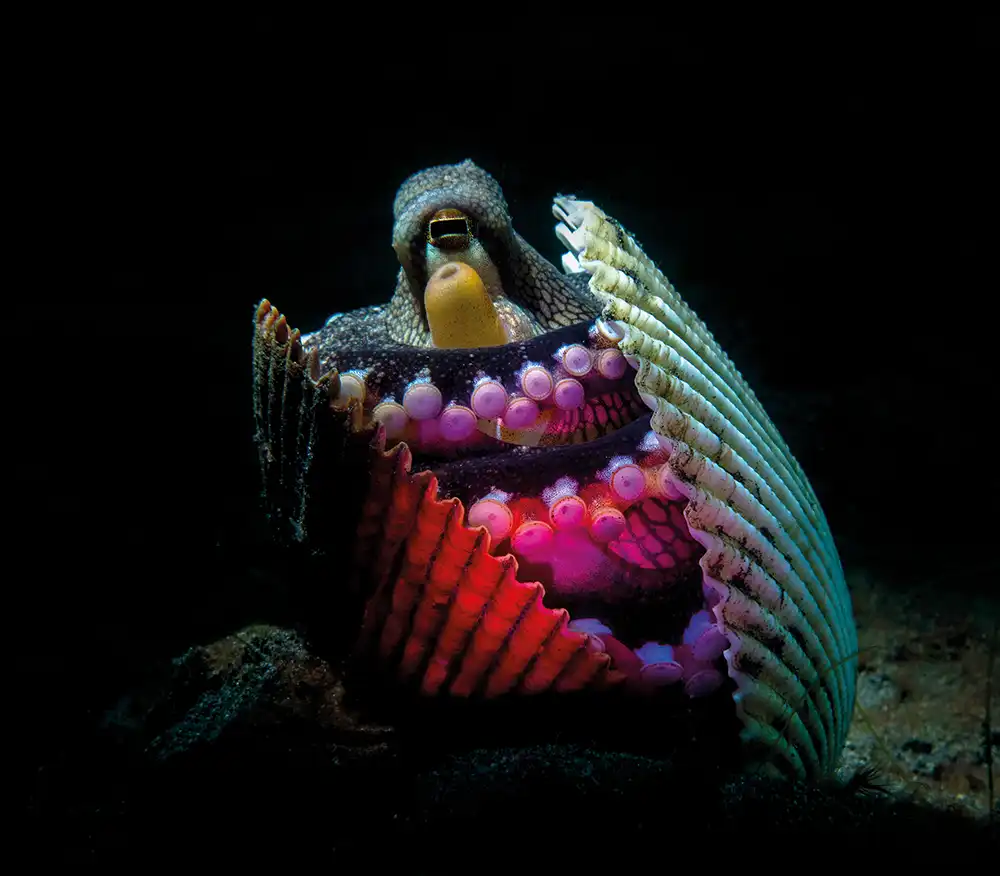
- COCONUT OCTOPUS (Amphioctopus marginatus) One of Lembeh’s most charismatic critters, this coconut octopus had taken shelter inside a colourful seashell. I used two different torches on each side to paint the scene, one red, one pink, while my dive guide Opo K simultaneously snooted the light to highlight the octopus’s textures. Patience and teamwork were essential for capturing this intimate portrait.
A narrow-beam torch is a constant light source that emits a tightly focused beam, typically between 5° and 10°, illuminating a very small, precise area while leaving everything else in darkness. A narrow beam behaves like a spotlight, letting me ‘paint’ with light and control exactly where I want it to fall – an eye, a texture, or the curve of a tentacle – while suppressing the distracting background clutter that Lembeh is famous for.
How I use it underwater: I mostly use a narrow-beam torch hand held, sometimes gently resting it on the muck. I often use it for backlighting translucent critters such as gobies, blennies, or seahorses. Sometimes I hold the torch to the side to rake light across texture – side lighting is excellent for revealing texture, particularly on hard corals. At other times, I sneak the light in from behind to separate the subject from the background.
KISS OF LIGHT

- THORNY SEAHORSE (Hippocampus histrix) A double-exposure image, with the seahorse on the left of the frame backlit with a narrow beam torch to create a bold silhouette with a translucent effect, and a kiss of light from the front to reveal textures. I captured sunlight through the water at 10m using the same Nikon 105 mm macro lens and used an in-camera image overlay to combine both shots into a single, dramatic frame.
A ‘kiss of light’ is exactly what it sounds like: the bare minimum amount of light needed to reveal a subject. Not to fully illuminate it, but just to let it exist. The darkness remains part of the image, and the light does not dominate; it simply touches the subject gently.
How I achieve it underwater: This is where Lembeh taught me restraint. On my strobes, I dial the power down far lower than feels ‘safe’, and deliberately aim slightly off axis so the flash just grazes the subject. I am often lighting just one thing: the glint of an eye, the edge of a fin, the line of a snout, or the rings on a blue-ringed octopus.
I frequently combine the kiss of light with backlighting. For example, I may back light a seahorse so that I initially see only its silhouette, then add a tiny amount of frontal flash to reveal its delicate textures.
CROSS-LIGHTING

- CANDY CRAB (Hoplophrys oatesii) Perfectly disguised among soft coral polyps, this tiny candy crab reveals incredible structural detail when lit correctly. I used cross-lighting to make the coral polyps glow while highlighting the crab’s delicate textures without overpowering its environment. This is how I created the black background.
Cross-lighting involves positioning strobes on both sides of the subject rather than straight on and is one of the quickest ways to separate a subject from its surroundings. Clutter is avoided, and the critter – often a nudibranch – appears against a black background.
How I use it underwater: I position my strobe arms so they extend in front of my housing facing towards the subject in the middle. I then quickly check the image preview and either increase or decrease the distance between the strobes and the subject, depending on the result.
SNOOTS (AND WHY I OBSESS OVER THEM)
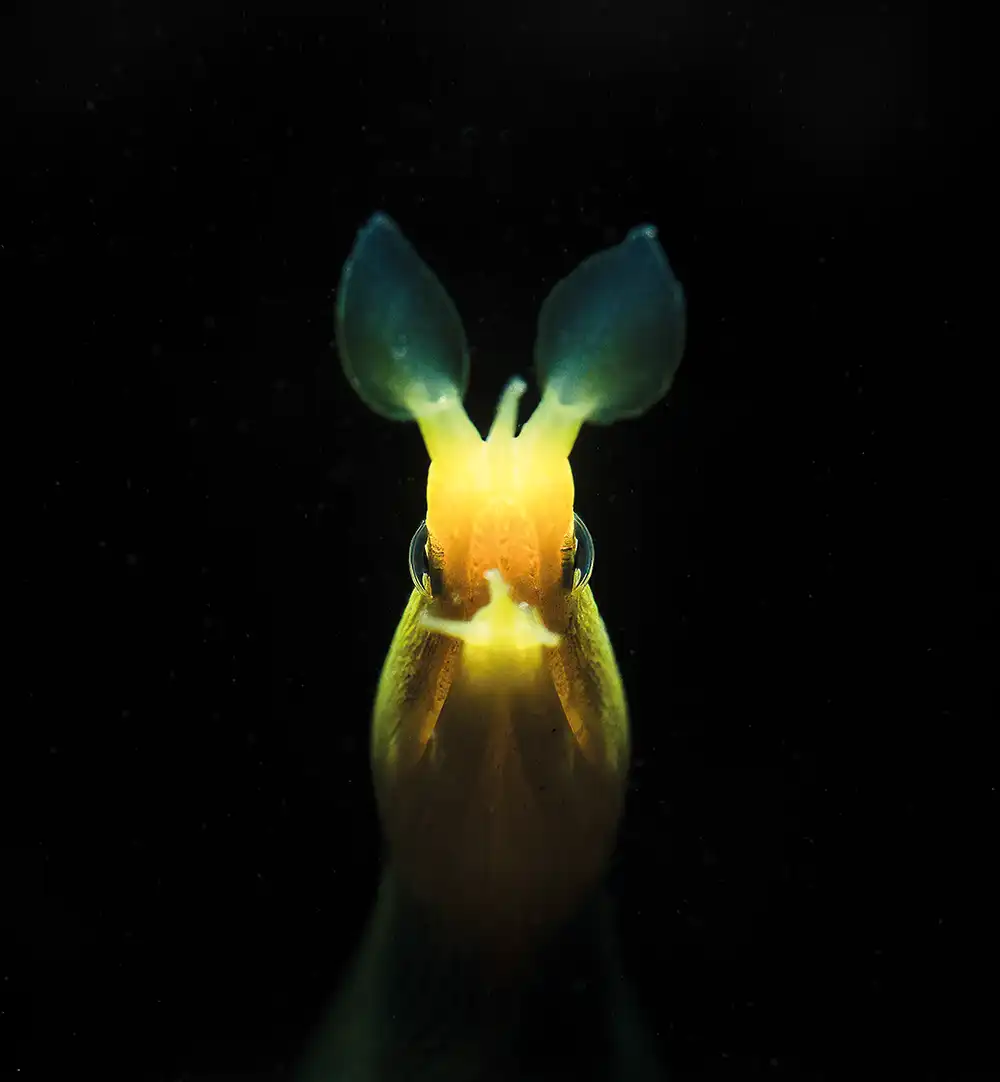
- YELLOW RIBBON EEL PORTRAIT (Rhinomuraena quaesita) For this snooted portrait, I spent two full 60-minute dives waiting for the eel to face me squarely. I wanted perfect focus only on the eyes while keeping the critter dramatically isolated against a black background. Ribbon eels are notoriously restless, so patience and precise strobe positioning were key. (Photo: Nur Tucker)
A snoot is a light-shaping tool that narrows a strobe or torch beam into a tight, controlled spot. Everything outside the beam falls into darkness, and the subject becomes isolated. In Lembeh, where backgrounds can be messy, snoots are one of the most powerful ways to simplify an image.
How I use one underwater: Using a snoot underwater feels like trying to thread a needle while floating. The snoot illuminates only the subject, but since it’s fixed to the underwater housing, it can shift position the moment you look through the viewfinder.
I often pre-focus using a focus light or targeting aid, then switch the camera to manual focus and start hunting for critters, which means that any critter that comes into focus will be illuminated. I move by fractions of a centimetre at a time then shoot, check and repeat. Miss by a few millimetres and the subject is unlit; miss by a little more and the frame is completely black.
Sometimes the animal moves and I have to start again. I would not recommend snooting for beginners, as it can be maddening. That said, snoots are also addictive – when they work, the result is worth it: a tiny critter becomes graphic and bold, floating in clean darkness like it is on a stage.
UNCONVENTIONAL & VINTAGE LENSES

- THE DEAD OCTOPUS I discovered this octopus at around three metres in Lembeh Strait. At first, I could not make sense of the strange, motionless shape, crowned with what looked like a ‘Marge Simpson’ hairstyle. Only then did I realise it was dead, and captured a few images using a Helios 44 lens with a reversed front element.
Unconventional and vintage lenses are usually very old, adapted from film cameras, sometimes with elements reversed, or combined with extension tubes and dioptres to create optical effects that modern lenses are designed to avoid.
They are not coated like modern lenses, and their out-of-focus areas can produce beautiful bokeh and dreamy backgrounds, at the expense of sharp subject detail. I own many of these lenses, including the Trioplan 100mm f/2.8, Helios 44 f/1.4, Domiplan, and Oreston.
They are so old that they sometimes rattle on my camera, or fall off inside the housing, but can produce softness, swirly backgrounds, soap bubbles, unpredictable flare, and a painterly feel – technically imperfect, but creatively full of character.
How I use them underwater: Underwater, vintage lenses are unforgiving. They are manual lenses, which means I have to move back and forth to find focus. Depth of field is razor-thin, and the smallest movement – mine or the subject’s – can ruin the frame, another excellent way of going slightly mad underwater.
But that risk is the point. I am trading certainty for surprise, and a vintage or reversed lens can make the scene feel spacey and cinematic. Sharp detail becomes selective, the background melts away, and the creature feels less like a specimen and more like a character.
In Lembeh, where the animals already feel slightly surreal, these lenses help me show not just what I saw, but what the encounter felt like.
LIGHT PAINTING UNDERWATER

- ORNATE GHOST PIPEFISH (Solenostomus paradoxus) I used simple front-lighting to reveal the exquisite details of this ornate ghost pipefish. These usually inhabit very cluttered backgrounds, making subject separation extremely difficult. By pure luck, I found this one hovering in open water, allowing me to photograph it with a clean black background. These fragile creatures demand patience, steady buoyancy, and precise strobe positioning. This image was a perfect candidate for a double exposure with light painting. I created a red light trail using my light painting blades and then used the camera’s image overlay function to combine them in camera.
Light painting involves creating a long-exposure image in complete darkness using a continuous, moving light source, shaping illumination over time rather than capturing it in a single flash.
How I do it underwater: I use light painting in several different ways. I have tools that can be immersed underwater, which I use to create backgrounds for my images.
For example, in the pygmy cuttlefish image above, the background was created using a fibre optic brush in a single exposure. I have also used electroluminescent (EL) wires in different ways, such as wrapped around a wine bottle, to create the spiral shape which I used to overlay a photograph of a thorny seahorse (see opening paragraphs).
I had to do this working from the surface as the battery compartment of the EL wires could not be submerged – and it took me a month to perfect. I’ve also used these tools on the surface to create artistic swirls, which I can later combine with macro portraits in-camera for a double exposure.
SHALLOW DEPTH OF FIELD

- NUDIBRANCH PORTRAIT I usually favour cross-lighting to isolate nudibranchs against a black background, but this time I wanted a softer look with pleasing bokeh. I positioned my strobes either side, angled slightly inward, and used a very shallow depth of field, carefully focussing on the rhinophores to ensure sharpness remained exactly where it needed to be.
Depth of field describes how much of an image appears sharp from front to back. A shallow depth of field means that only a thin slice is in focus, while everything else blurs away.
Underwater, where backgrounds can be distracting, shallow depth of field is one of the most effective ways to simplify the scene and guide the viewer’s eye. One of the biggest questions is which f-stop to use for shallow depth of field. Many photographers assume that a wide aperture, or low f-stop, is the only way to achieve the effect – but the amount of blur depends on the size of the subject, how close you are to it, and the magnification used.
If I am shooting super-macro or extreme macro, where magnification is enormous, even a very small aperture such as f/45 can produce a very shallow depth of field. However, when using a 60mm macro lens to photograph a larger subject, a much wider aperture such as f/2.8 might be necessary to produce a strong background blur.
How I use it underwater: In macro photography, shallow depth of field can become extreme. Sometimes I am so close that only an eye is sharp and the rest of the animal dissolves into softness. The effect is intimate, forcing the viewer to look exactly where I want them to, but it is also risky – a tiny movement shifts the plane of focus completely.
If the subject breathes, sways, or turns, I can lose the sharp point, so I slow down, brace my position, time my shot, and accept that I will often need many frames to get one that sings. I try to target both eyes squarely. In the case of nudibranchs, both rhinophores should be facing me; otherwise, one eye or one rhinophore will be soft.
BOKEH – WHY BLUR CAN BE THE SHARPEST TOOL

- PYGMY CUTTLEFISH WITH LIGHT-PAINTED BACKGROUND (Sepia bandensis) My dive guide Opo K was thrilled to find this tiny cuttlefish resting under a sea grass blade. I used a light painting technique for the purple bokeh background, capturing the scene entirely in-camera. The combination of sharp eye detail and dreamy background creates a unique visual effect. This is not a double exposure.
The term bokeh comes from Japanese and, in photography, describes the aesthetic character of blur – whether highlights turn creamy, nervous, circular, swirly or painterly.
In macro photography, however, and especially in Lembeh, bokeh is not just decoration. It is control.
How I use it underwater: Bokeh is one of the most powerful ways I know to simplify chaos. The seabed is cluttered with visual noise: grains of sand, shell fragments, algae, rubble and fragments of coral. If I render all of it in focus, the subject can disappear into distraction. But when the background softens, the animal separates, steps forward, and suddenly pops.
Two distances matter enormously: the space between me and the subject, and the space between the subject and the background. The closer I move in, the stronger the blur, and the further the background sits behind the critter, the faster it melts away. Very often, simply changing my angle so that the sand drops into the distance can transform the image.
Light is equally important. Bokeh needs something bright to bloom. If I can position a strobe or narrow-beam torch so it catches suspended particles or reflective sand behind the subject, those tiny highlights expand into luminous orbs. Mud becomes stars.
Bokeh is created when parts of the scene fall outside the plane of focus. The wider the aperture, the longer the focal length, and the closer I am to the subject, the thinner that plane becomes. At high magnification, depth of field becomes microscopic.

- FROGFISH WITH ITS LURE HUNTING I placed my narrow-beam torch just behind the face of the frogfish, creating the effect of a sun in the image. The frogfish is reduced to a silhouette, with its lure drawing the viewer’s eye.
Even stopping down to f/16 or f/22 can leave most of the frame dissolving into blur. Open wider, and the effect becomes dramatic: colour replaces detail, edges melt, highlights bloom. I sometimes achieve bokeh by working very close and deciding exactly where that sliver of focus must sit – usually the critter’s eye – while allowing everything else to fall away.
At other times, I choose lenses specifically because of how they render the out-of-focus world. My vintage optics, such as the Helios or Trioplan, are famous not just for blur, but for the shape of that blur, turning background highlights into bubbles, swirls or glowing discs. Where modern lenses aim for perfection, these older designs create personality.
There is no autofocus to rescue me, however, so I must move the camera back and forth in the water, waiting for the creature’s eye to pass through that razor-thin plane of sharpness. Entire hours can evaporate while I chase a few millimetres of precision, but when it lands – when the eye locks in and the background explodes into character – it is worth every failed attempt.
THE STRONGEST OF MY EIGHT ARMS

- CLOWNFISH EGGS CLOSE-UP I used a Nikon 105mm macro lens with a strong diopter to capture the developing eyes of these microscopic clownfish embryos. A narrow depth of field allowed me to create a bubble bokeh background, formed by softly blurring the surrounding eggs behind the focal plane. The result highlights the embryos’ sparkling eyes and reveals the hidden beauty of life beneath the surface.
Bokeh is a combination of all the tools in my eight-armed kit. It allows me to subtract rather than add. Instead of fighting the background, I dissolve it. Instead of describing habitat, I emphasise presence. It turns documentation into interpretation.
Yes, it is unforgiving. The success rate is low, and frustration is high. But in Lembeh, where surprise is always waiting, that risk feels like part of the adventure.
When everything aligns, the clutter disappears, the subject rises from softness, and for a fraction of a second the image becomes something more than a record. It becomes a feeling.
You can find more from Nur on her website at www.nurtucker.com and Instagram @nurtuckerphotography. Nur is chair of the British Society of Underwater Photographers (BSoUP). Learn more at bsoup.org.uk
The post Eight arms, six lamps and one perfect shot – mastering macro with Nur Tucker appeared first on DIVE Magazine.
